标签 - Linux 共找到结果 24 条

之前记录过怎么使用yum安装mysql5.6:CentOS7 yum安装mysql5.6,由于某些原因需要升级mysql版本,

卸载旧版本mysql

当然要记得备份数据库数据

1.查看需要卸载的部分:

rpm -qa |grep -i mysql

2.开始卸载:

yum remove mysql-community-release mysql-community-server mysql-community-common mysql-community-libs mysql-community-client

3.清理文件:

find / -name mysql

接下来是安装新版mysql

1.下载并安装源:

wget http://dev.mysql.com/get/mysql57-community-release-el7-7.noarch.rpm
yum localinstall mysql57-community-release-el7-7.noarch.rpm

2.开始安装:

yum install -y mysql-server
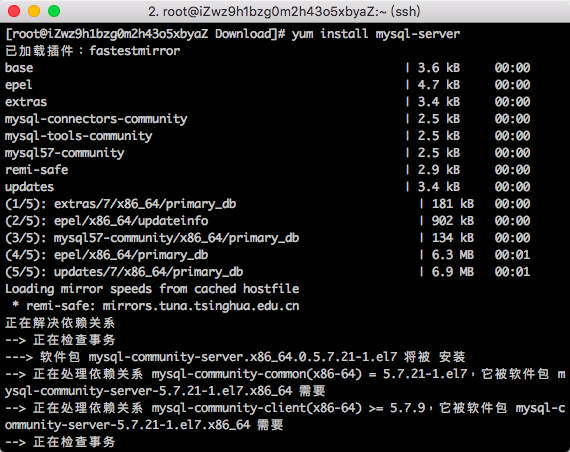
3.安装完成并确认版本:

mysql --version

4.接下来就去恢复数据库数据吧.

遇到的问题

  • 1.MySQL 5.7 在初始安装后(CentOS7 操作系统)会生成随机初始密码,并在 /var/log/mysqld.log 中有记录,可以通过 cat 命令查看,找 password 关键字
grep 'temporary password' /var/log/mysqld.log

不过使用该临时密码登录的时候却出错了.

解决办法:

1.修改 /etc/my.cnf,在 [mysqld] 小节下添加一行:skip-grant-tables=1 这一行配置让 mysqld 启动时不对密码进行验证
2.重启 mysqld 服务:systemctl restart mysqld
3.使用 root 用户登录到 mysql:mysql -u root
4.`切换到mysql数据库,更新user表:
update user set authentication_string = password('新密码'), password_expired = 'N', password_last_changed = now() where user = 'root';
5.退出 mysql,编辑/etc/my.cnf文件,删除skip-grant-tables=1的内容并重启mysqld服务
  • 2.mysql远程连接1130问题可参考之前的文章: CentOS7 yum安装mysql5.6

  • 3.新增用户提示:ERROR 1819 (HY000): Your password does not satisfy the current policy requirements

解决办法:

这个其实与validate_password_policy的值有关。 默认是1,即MEDIUM,所以刚开始设置的密码必须符合长度,且必须含有数字,小写或大写字母,特殊字符。 所以只需要修改值为0:

set global validate_password_policy=0;

再次尝试新建用户即可;

参考地址:

阅读全文

1. 下载pm2:

cnpm install -g pm2

2. pm2启动项目:

# 启动项目
pm2 start /usr/share/nginx/vue-blog/src/server/bin/www
# 保存当前进程状态
pm2 save
# 生成开机自启动服务
pm2 startup

3. 启用开机自启:

systemctl enable pm2-root

阅读全文

1. 关于安装树莓派系统:

请查看之前的文章介绍: 树莓派Raspberry Pi 3 安装CentOS7,选择官方镜像安装debian版

2. 安装vnc服务端:

sudo apt-get install tightvncserver

当然,很有可能安装不上,这时候就需要本地安装:

cd /tmp/
wget http://mirrordirector.raspbian.org/raspbian/pool/main/x/xfonts-base/xfonts-base_1.0.3_all.deb
sudo dpkg -i xfonts-base_1.0.3_all.deb

wget很慢的话可以使用本地下载后利用sftp工具上传到树莓派内再执行安装

3. 安装vnc客户端

请在以下链接安装: vncviewer

4. 在树莓派上配置vnc

  • 首先要修改vnc密码:SSH终端里执行vncpasswd,然后输入两遍密码。
  • 输入密码后还会问你是否输入个只能观看不能操作的密码,一般选择n,也就是不设置。
  • 自启动可以直接rc.local内部调用:
sudo nano /etc/rc.local
#rc.local添加:
#开机时使用默认账户`pi`启动VNC服务
sudo -u pi vncserver

5. 本地连接树莓派vnc:

本地连接,记得树莓派地址填: ip:1 ,比如树莓派IP为 192.168.0.200,那么 vnc viewer要填上 192.168.0.200:1

阅读全文

树莓派安装的CentOS用不了第三方软件园,只好通过make install安装nginx

1. 下载nginx软件源码:

wget http://nginx.org/download/nginx-1.10.3.tar.gz
tar xf nginx-1.10.3.tar.gz

2. 利用yum 安装pcre pcre-devel openssl 等包

yum install pcre pcre-devel openssl openssl-devel gcc -y

3. 开始安装

cd nginx-1.10.3
./configure --user=nginx --group=nginx --prefix=/usr/local/nginx --with-http_ssl_module --with-http_stub_status_module
make && make install

4. 配置

cd /usr/local/nginx/conf
sed -n 30,40p nginx.conf
//检查语法
/usr/local/nginx/sbin/nginx -t

输出:

nginx: the configuration file /usr/local/nginx/conf/nginx.conf syntax is ok
nginx: configuration file /usr/local/nginx/conf/nginx.conf test is successful

则为配置正确,但是有可能会报错:

[emerg] getpwnam("nginx") failed

错误的原因是没有创建nginx这个用户,应该在服务器系统中添加nginx用户组和用户nginx,如下命令:

/usr/sbin/groupadd -f nginx
/usr/sbin/useradd -g nginx nginx

5. 启动nginx服务:

/usr/local/nginx/sbin/nginx

启动后查看是否运行成功:

ps aux | grep nginx
//输出
root      4034  0.0  0.1   8144  1852 ?        Ss   12:13   0:00 nginx: master process ./sbin/nginx
nginx     4035  0.0  0.3   8284  2908 ?        S    12:13   0:00 nginx: worker process
root      4121  0.0  0.0   2680   572 pts/0    S+   12:29   0:00 grep --color=auto nginx

可以访问本地端口试试:

curl -I localhost:80
//输出
HTTP/1.1 200 OK
Server: nginx/1.10.3
Date: Thu, 05 Oct 2017 12:13:55 GMT
Content-Type: text/html
Content-Length: 612
Last-Modified: Thu, 05 Oct 2017 11:00:46 GMT
Connection: keep-alive
ETag: "59d610de-264"
Accept-Ranges: bytes

阅读全文

1. 下载NodeJS源码

如果是以前,可能是叫你去下载源码编译…以树莓派的性能来编译Node.js的源码,应该至少一个小时吧?

幸运的而是官方已经提供了,编译的树莓派二进制包,所以就不要再去下源码编译了…

wget https://npm.taobao.org/mirrors/node/v0.11.12/node-v0.11.12-linux-arm-pi.tar.gz
tar -xvzf node-v0.11.12-linux-arm-pi.tar.gz
node-v0.11.12-linux-arm-pi/bin/node --version

https://npm.taobao.org/mirrors/node/v0.11.12/node-v0.11.12-linux-arm-pi.tar.gz是树莓派上可用的NodeJS, 其余可在https://npm.taobao.org/mirrors/node/ 查看

解压后,移动文件夹到/usr/local/sbin:

mv node-v0.11.12-linux-arm-pi /usr/local/sbin

接下来写进我们的环境变量:

vi .bash_profile
//然后在里面写
PATH=$PATH:$HOME/bin:/usr/local/sbin/node-v0.11.12-linux-armv7l/bin

在运行source 更新

source .bash_profile

现在就可以直接执行node -v查看是否生效了

参考地址:

  1. http://cnodejs.org/topic/54032efa9769c2e93797cd06

阅读全文