树莓派安装的CentOS用不了第三方软件园,只好通过make install安装nginx

1. 下载nginx软件源码:

wget http://nginx.org/download/nginx-1.10.3.tar.gz
tar xf nginx-1.10.3.tar.gz

2. 利用yum 安装pcre pcre-devel openssl 等包

yum install pcre pcre-devel openssl openssl-devel gcc -y

3. 开始安装

cd nginx-1.10.3
./configure --user=nginx --group=nginx --prefix=/usr/local/nginx --with-http_ssl_module --with-http_stub_status_module
make && make install

4. 配置

cd /usr/local/nginx/conf
sed -n 30,40p nginx.conf
//检查语法
/usr/local/nginx/sbin/nginx -t

输出:

nginx: the configuration file /usr/local/nginx/conf/nginx.conf syntax is ok
nginx: configuration file /usr/local/nginx/conf/nginx.conf test is successful

则为配置正确,但是有可能会报错:

[emerg] getpwnam("nginx") failed

错误的原因是没有创建nginx这个用户,应该在服务器系统中添加nginx用户组和用户nginx,如下命令:

/usr/sbin/groupadd -f nginx
/usr/sbin/useradd -g nginx nginx

5. 启动nginx服务:

/usr/local/nginx/sbin/nginx

启动后查看是否运行成功:

ps aux | grep nginx
//输出
root      4034  0.0  0.1   8144  1852 ?        Ss   12:13   0:00 nginx: master process ./sbin/nginx
nginx     4035  0.0  0.3   8284  2908 ?        S    12:13   0:00 nginx: worker process
root      4121  0.0  0.0   2680   572 pts/0    S+   12:29   0:00 grep --color=auto nginx

可以访问本地端口试试:

curl -I localhost:80
//输出
HTTP/1.1 200 OK
Server: nginx/1.10.3
Date: Thu, 05 Oct 2017 12:13:55 GMT
Content-Type: text/html
Content-Length: 612
Last-Modified: Thu, 05 Oct 2017 11:00:46 GMT
Connection: keep-alive
ETag: "59d610de-264"
Accept-Ranges: bytes

阅读全文

1. 下载NodeJS源码

如果是以前,可能是叫你去下载源码编译…以树莓派的性能来编译Node.js的源码,应该至少一个小时吧?

幸运的而是官方已经提供了,编译的树莓派二进制包,所以就不要再去下源码编译了…

wget https://npm.taobao.org/mirrors/node/v0.11.12/node-v0.11.12-linux-arm-pi.tar.gz
tar -xvzf node-v0.11.12-linux-arm-pi.tar.gz
node-v0.11.12-linux-arm-pi/bin/node --version

https://npm.taobao.org/mirrors/node/v0.11.12/node-v0.11.12-linux-arm-pi.tar.gz是树莓派上可用的NodeJS, 其余可在https://npm.taobao.org/mirrors/node/ 查看

解压后,移动文件夹到/usr/local/sbin:

mv node-v0.11.12-linux-arm-pi /usr/local/sbin

接下来写进我们的环境变量:

vi .bash_profile
//然后在里面写
PATH=$PATH:$HOME/bin:/usr/local/sbin/node-v0.11.12-linux-armv7l/bin

在运行source 更新

source .bash_profile

现在就可以直接执行node -v查看是否生效了

参考地址:

  1. http://cnodejs.org/topic/54032efa9769c2e93797cd06

阅读全文

1. 关于树莓派

https://www.raspberrypi.org 树莓派是一个Arm的开发板,只有香烟盒大小,最新版的是树莓派3。 CPU: 64位A53(BCM2837),主频: 1.2GHz; GPU: 主频 400GHz 1G内存大小,4个usb接口。  https://www.raspberrypi.org/products/model-b-plus/  
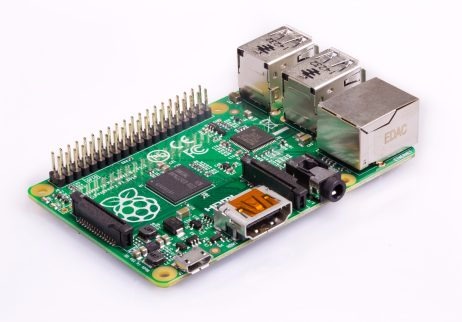
SD卡是自己购买的。16G Kingston 。

2.下载img

官方下载: 直接下载镜像文件格式的。 https://www.raspberrypi.org/downloads/raspbian/

centos7: 下载地址 http://mirror.centos.org/altarch/7/isos/armhfp/ 选择RaspberryPi3.img.xz centos7的系统文件双击解压缩时候出现". cpgz"文件,建议使用"The Unarchiver"工具来解压

3.镜像安装

1),首先格式化磁盘。 官方推荐使用 sdcard formatter,这个只识别sd卡,不会出现格式错误的问题。支持windows 和 mac两个系统。  https://www.sdcard.org/downloads/formatter_4/  操作简单点击下就行。

2),查看磁盘

$ df -lh
Filesystem     Size   Used  Avail Capacity iused      ifree %iused  Mounted on
/dev/disk1    233Gi  193Gi   39Gi    84%  814544 4294152735    0%   /
/dev/disk2s1   15Gi  2.3Mi   15Gi     1%       0          0  100%   /Volumes/BOOT

记住磁盘叫/dev/disk2s1。  在写入镜像文件之前,先卸载磁盘。

$ sudo diskutil umount /dev/disk2s1
Password:
Volume BOOT on disk2s1 unmounted

然后开始写入文件。(特别注意写入文件没有s1且前面多了个r,/dev/disk2s1对应的输出文件是/dev/rdisk2

$ sudo dd bs=1m if=./CentOS-Userland-7-armv7hl-Minimal-1708-RaspberryPi3.img of=/dev/rdisk2
3072+0 records in
3072+0 records out
3221225472 bytes transferred in 323.460223 secs (9958645 bytes/sec)

写入文件成功后,可以在磁盘管理里面看到多了个4644C237磁盘,说明写入文件成功。  
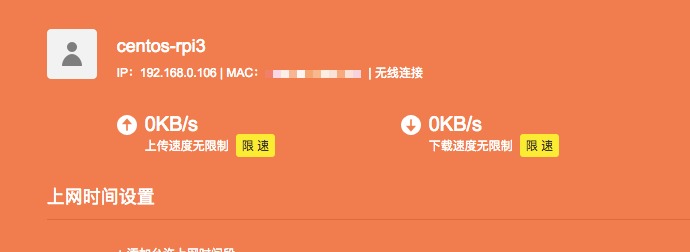
然后SD卡插入树莓派3,上电,连接网线到路由器,登录路由器查看IP是否有分配,如果有,使用SSH远程登录,默认名:root,密码:centos。

参考地址:

阅读全文

公司最近这个项目用的是spring boot,但是又需要前端使用Vue.js进行开发,单独使用requireJS和Vue.js配合又不方便,所以想到了直接使用webpack开发.

以下webpack介绍copy自:《入门Webpack,看这篇就够了》

为什要使用WebPack

现今的很多网页其实可以看做是功能丰富的应用,它们拥有着复杂的JavaScript代码和一大堆依赖包。为了简化开发的复杂度,前端社区涌现出了很多好的实践方法:

  • 模块化,让我们可以把复杂的程序细化为小的文件;
  • 类似于TypeScript这种在JavaScript基础上拓展的开发语言:使我们能够实现目前版本的JavaScript不能直接使用的特性,并且之后还能转换为JavaScript文件使浏览器可以识别;
  • Scss,less等CSS预处理器
  • ...

这些改进确实大大的提高了我们的开发效率,但是利用它们开发的文件往往需要进行额外的处理才能让浏览器识别,而手动处理又是非常繁琐的,这就为WebPack类的工具的出现提供了需求。

以下贴出我的配置文件:

1. webpack.base.config.js: (PS:这只是基础配置,因为还需要一个webpack生产环境,所以把代理单独提到webpack开发环境配置中)
/**
 * webpack配置基础
 */
const webpack = require('webpack');
const path = require('path');
const ExtractTextPlugin = require('extract-text-webpack-plugin');
const OpenBrowserPlugin = require('open-browser-webpack-plugin');
const vendor = ["iview", "vuex", "vue-router", "echarts"];
const config = {
    entry: {
        main: './app/main.js',
        vendor: vendor //CommonsChunkPlugin打包第三方
    },
    output: {
        filename: '[name].js',
        path: path.join(__dirname + '/public/dist/'),
        publicPath: '/public/dist/'
    },
    resolve: {
        alias: {
            'vue$': 'vue/dist/vue.common.js'
        }
    },
    externals: {
        'jquery': 'window.jQuery',
        'moment': 'window.moment',
    }, //较大的库引用cdn文件
    module: {
        rules: [{
                test: /.vue$/,
                loader: 'vue-loader',
                options: {
                    loader: {
                        css: ExtractTextPlugin.extract({
                            use: ['css-loader'],
                            fallback: 'style-loader'
                        })
                    }
                }
            },
            {
                test: /.js$/,
                exclude: /node_modules/, //编译打包时需要排除 node_modules 文件夹
                loader: "babel-loader",
                query: { presets: ['es2015'] }
            },
            {
                test: /.scss$/,
                // loader: "style-loader!css-loader"
                use: ExtractTextPlugin.extract({
                    fallback: "style-loader",
                    use: ["css-loader", "sass-loader"]
                })
            },
            {
                test: /.css$/,
                use: ExtractTextPlugin.extract({
                    fallback: 'style-loader',
                    use: ['css-loader']
                })
            },
            {
                test: /.(gif|jpg|png|woff|woff2|ttf|svg|eot$)??.*$/,
                loader: "url-loader?limit=10240&name=./[name].[ext]?[hash]"
            }
        ]
    },
    plugins: [
        new OpenBrowserPlugin({ url: 'http://localhost:3000' }),
        new webpack.ProvidePlugin({
            $: 'jquery',
            jQuery: 'jquery',
            'window.jQuery': 'jquery',
            'window.$': 'jquery'
        }), //这个可以使jquery变成全局变量,不用在自己文件require('jquery')了
        new webpack.optimize.CommonsChunkPlugin({
            name: ['vendor'],
            filename: 'common.js'
        }), //第三方库打包生成的文件
        new ExtractTextPlugin({
            filename: '[name].css',
            allChunks: true
        }), //分离 CSS 和 JS 文件.
    ]
};
module.exports = config;
2. webpack.config.js:
/**
 * webpack开发环境
 */
 
const merge = require("webpack-merge");
const WebpackBaseConfig = require("./webpack.base.config");
 
module.exports = merge(WebpackBaseConfig, {
    devServer: {
        port: 3000,
        proxy: {
            '*': {
                //后台地址
                target: 'http://localhost:8080',
                secure: false,
                prependPath: false,
                changeOrigin: true
            }
        },
        publicPath: '/public/dist/',
        historyApiFallback: true
    }
});
3. webpack.prod.config.js:
/**
 * webpack生产环境
 */
 
const webpack = require("webpack");
const ExtractTextPlugin = require("extract-text-webpack-plugin");
const HtmlWebpackPlugin = require("html-webpack-plugin");
const merge = require("webpack-merge");
const WebpackBaseConfig = require("./webpack.base.config");
WebpackBaseConfig.plugins = [];
WebpackBaseConfig.module.rules[1] = {
    test: /.js$/,
    //通常需要忽略node_modules,但iviews包含es6代码,压缩时需要转换成es5
    // exclude: /node_modules/, //编译打包时需要排除 node_modules 文件夹
    loader: "babel-loader",
    query: { presets: ['es2015'] }
}
module.exports = merge(WebpackBaseConfig, {
    output: {
        filename: '[name].[hash].js',
        publicPath: '/public/dist/'
    },
    plugins: [
        new webpack.ProvidePlugin({
            $: 'jquery',
            jQuery: 'jquery',
            'window.jQuery': 'jquery',
            'window.$': 'jquery'
        }), //这个可以使jquery变成全局变量,不用在自己文件require('jquery')了
        new webpack.optimize.CommonsChunkPlugin({
            name: ['vendor'],
            filename: 'common.[hash].js'
        }), //第三方库打包生成的文件
        new webpack.DefinePlugin({
            'process.env': {
                NODE_ENV: '"production"'
            }
        }),
        //在这个数组中new一个实例就可以了
        new webpack.BannerPlugin("Copyright mrabit."),
        //为组件分配 ID,通过这个插件 Webpack 可以分析和优先考虑使用最多的模块,并为它们分配最小的 ID.
        new webpack.optimize.OccurrenceOrderPlugin(), 
        new webpack.optimize.UglifyJsPlugin({
            compress: {
                warnings: false,
                drop_debugger: false,
                drop_console: false
            }
        }), //压缩JS代码.
        new ExtractTextPlugin({
            filename: '[name].[hash].css',
            allChunks: true
        }), //分离 CSS 和 JS 文件.
        new HtmlWebpackPlugin({
            filename: '../../index.html',
            template: './index.ejs',
            inject: false
        })
    ]
});
4. 通过上面的配置可实现webpack-dev-server3000端口去代理8080端口。在package.json中添加:
"scripts": {
    "dev": "rimraf public/dist/* && webpack-dev-server --host 0.0.0.0 --history-api-fallback --inline --hot",
    "build": "rimraf public/dist/* && webpack --progress --config webpack.prod.config.js"
},
5. 之后直接启动spring boot后台,然后npm run dev就可以通过访问3000端口来进行前端的开发了.
6. 当然,这里推荐使用微软的VSCode,虽然我平时用的都是WebStorm,但是相对于webpack开发,VSCode确实要流畅很多

阅读全文

我们知道canvas画布可以很方便的js原生支持转为图片格式并下载,但是svg矢量图形则并没有这方面原生的支持。 研究过HighChart的svg图形的图片下载机制,其实现原理大体是浏览器端收集SVG代码信息,并发送到到服务器端,由后端程序转换成图片格式后,以流的形式反射给浏览器端下载。

最近在项目中有需求将一个非HighChart的SVG地图转存为图片并下载的功能。 本希望模拟HighChart的原理实现,可是研究发现,该地图的SVG代码信息多达两万字节,然而HighChart后端制图程序却有着字节数限制,所以就不能这么处理了。

然后国外社区讨论的方法也多是前后端协同处理来完成这个功能的,这样实现会比较重, 而且部署不便。

经过一番搜寻,终于发现一个不依赖任何外部库,框架,同时仅仅通过浏览器端js便能实现的方法。 代码实现的具体来源地址已经忘记了, 这里保留代码原创作者的版权哈。

首先,我们约定SVG的上下文结构是如下的:

<div class="svg-wrap">
  <svg>...<svg>
<div>

然后,我们就可以通过如下代码来将svg图形转为图片并下载了:

var svgXml = $('.svg-wrap').html();

var image = new Image();
image.src = 'data:image/svg+xml;base64,' + window.btoa(unescape(encodeURIComponent(svgXml))); //给图片对象写入base64编码的svg流

var canvas = document.createElement('canvas');  //准备空画布
canvas.width = $('.svg-wrap svg').width();
canvas.height = $('.svg-wrap svg').height();

var context = canvas.getContext('2d');  //取得画布的2d绘图上下文
context.drawImage(image, 0, 0);

var a = document.createElement('a');
a.href = canvas.toDataURL('image/png');  //将画布内的信息导出为png图片数据
a.download = "MapByMathArtSys";  //设定下载名称
a.click(); //点击触发下载

阅读全文